Proxying Cloudinary Requests with Netlify
My site (and several other side projects) is hosted on Netlify, so I had been eagerly awaiting access to Netlify Edge. I’ve been pretty vocal about my excitement for edge computing solutions, and having access to one right within Netlify would be very handy. One of the first things I planned to do once I had access was switch my images to be housed on Cloudinary, and then use Netlify Edge to proxy the requests through my own domain.
I hand-optimize my images (ok fine my computer does it but whatever) before I add them to my site, so they’re usually pretty small already, but there are limitations to how far I can take it myself without making things incredibly complex. I can try to automate things like generating the right sizes, creating several formats, serving those formats up to different browsers, as well as the actual optimization itself. That’s all fine, but that’s a lot to manage.
Cloudinary can handle that for me. Their service is capable of automatically compressing images to the highest degree of compression while still maintaining acceptable levels of quality. They can also determine the best file format for each image based on that image’s characteristics and whatever a particular browser supports. There’s much more they can do, but those two things alone are super appealing.
What isn’t appealing, and the reason I haven’t used Cloudinary for my own personal stuff yet, is the separate domain the browser would need to connect to in order to serve those images. Images from Cloudinary are served from https://res.cloudinary.com. When the browser sees this domain, it has to open up another HTTP connection, going through the process of resolving the DNS, opening the TCP connection and handling SSL negotiation. The separate domain also messes with HTTP/2’s snazzy prioritization schemes. (Though, on my own site, that’s not a big deal because the number of resources on a given page is pretty small).
So my plan was to take Netlify Edge and proxy any requests to Cloudinary through my own domain. That would let Netlify do the connection on their end, saving the browser from having to do it.
Turns out, I didn’t need Edge for this—I could’ve been doing this all along with Netlify’s redirects.
Phil posted a short demo of how you can use Netlify’s redirects to proxy requests to another service automagically. Netlify handles the connection to the service at the CDN level, which means the browser only ever sees the one domain.
So, naturally, I had to give it a shot (I try to keep it a secret from him, but I do find listening to Phil to be a smart decision…sometimes).
First up was adding the redirect rule to my netlify.toml configuration file, just like Phil said to do:
[[redirects]]
  from = "/optim/:image"
  to = "https://res.cloudinary.com/tkadlec/image/fetch/q_auto,f_auto/https://timkadlec.com/images/:image"
  status = 200
Breaking this down:
- The
fromdirective tells Netlify which requests to apply the redirect to. In this case, we’re saying all requests made to the/optimdirectory. We’re capturing the image name as:imageso we can reference it later. - The
todirective tells Netlify where to route that request. Here we’re using Cloudinary’s fetch functionality (note the “fetch” segment of the URL) to fetch the original image from my site and load it into their service so they can optimize it. This is also where we use:imageto refer back to the image name that we captured in thefromsection. - Finally, we set the status to “200”, indicating the request completed succesfully. This is the key bit for this from Netlify’s perspective: by setting the status to 200, we officially make this redirect a rewerite instead.
Confession time: I messed this up at first. I originally had the from directive setup like this:
from = "/images/:image"
I was being lazy, and I thought this way I wouldn’t have to update any image references in my site—they’d just work. A bunch of you (maybe all of you) already see the problem here.
By using the same directory name as the one the images are actually in, I create some circular logic. Netlify sees a request to something in my /image directory so it routes that to Cloudinary, passing along the full path. Cloudinary needs to request that image so it makes a request to the image, again in the /images/ directory. Netlify has to serve that image to Cloudinary, but it sees that it should be redirecting any request to /images/ to Cloudinary, so it does. And on and on we go again.
It was a silly mistake on my part, but I can imagine others making it too so I figure it’s worth noting.
With the configuration file updated, I then have to update the reference to any images I want to route to Cloudinary to use the /optim route. That means changing from this:
<img src="/images/headshot-transparent.png">To this:
<img src="/optim/headshot-transparent.png">And voilà—we’ve got automatic image optimization via Cloudinary, without having to do anything to my build process or even touch Cloudinary directly.
I mentioned the two appealing parts of this to me were the advanced image optimization Cloudinary can provide and the ability to avoid that separate domain connection, and I’m pretty happy with the results from both.
Even with the fact that I pre-optimize images before putting them on my site, the additional compression and format conversions that Cloudinary provides gave a nice little boost. Here’s the size of the images on my home page before and after I used Cloudinary, as measured on a Moto G6 via WebPageTest:
| Without Cloudinary | With Cloudinary | Savings |
|---|---|---|
| 100.2kb | 73.1kb | 27.1kb |
Now, 27kb may or may not seem like much—depending on how much of a performance nut you are—but my home page is pretty light so that represents a 23% reduction in bytes from only a couple minutes of work.
Next let’s look at the second part of this: eliminating the separate connection.
Here’s a run from WebPageTest (3G network, Moto G6) showing my home page using Cloudinary without proxying through Netlify.
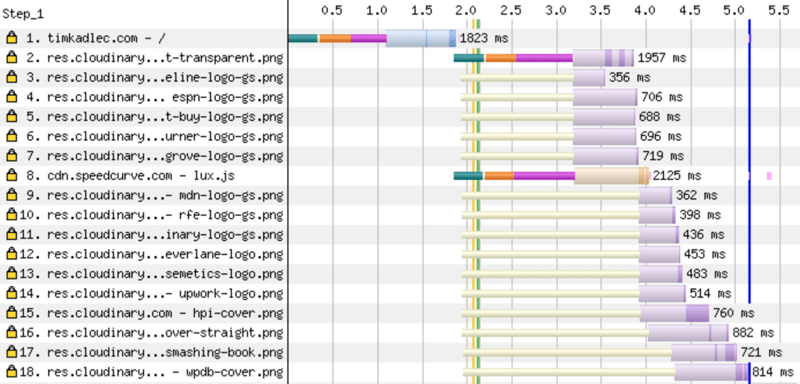
Request #2 shows the cost of connecting to res.cloudinary.com (the green, orange and purple bars). Because of that delay, the request doesn’t complete until ~3.8s and the final image (request #18) doesn’t arrive until ~5.1s.
Notice how before the image gets to be downloaded (request #2), the browser has to go through the process of the DNS resolution (green bar), TCP Connection (orange bar), and SSL negotiation (purple bar) causing the images to be delayed.
In this case, it took 1.3 seconds for that connection to be opened, and as a result, my headshot image (request #2) doesn’t arrive until about 3.8 seconds into the page load. Our final image doesn’t arrive until 5.1 seconds into the page load process.
By proxying through Netlify, we avoid that overhead altogether. Here’s what that looks like, using the same test conditions in WebPageTest:
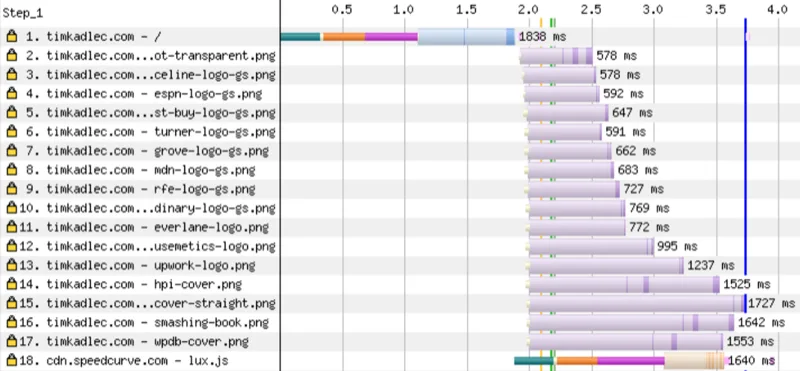
By proxying the requests through Netlify, we no longer see any connection costs for the images (requests #2-17). Without the delay, the headshot image (request #2) arrives around 2.5 seconds and the final image (request #17) arrives around ~3.7s.
In this waterfall, you can see that the separate connection is gone altogether, meaning we get to start downloading those images very quickly. The result is that same headshot image (request #2, again) arrives around 2.5 seconds—about 1.3 seconds faster than without the proxy. The final image arrives 3.7 seconds into the page load process, around 1.4 seconds than before.
So we get reduced data cost, with no extra connection from the browser, and what appears to be pretty negligible cost at the CDN (the difference in response time for the final proxied images versus loading them without Cloudinary in place is barely noticeable in my tests)—and it all took just a few minutes to put into place. It’s also a great way to make the right thing easy by making all these optimizations happen with virtually no effort on my part.
Not too shabby, Netlify.